Precision Surface Restoration: Achieving Seamless Finishes with Drywall Patch Mesh
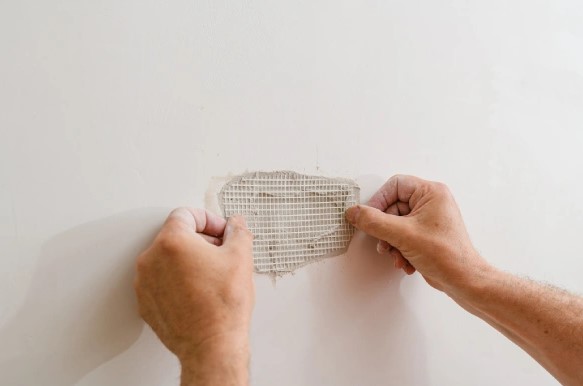
Source:https://rrdrywallaz.com
You are moving a couch around a tight corner, or maybe your teenager got a little too enthusiastic with a door handle. Thump. Suddenly, you are staring at an ugly, jagged hole right in the middle of your pristine living room wall. It is an instant eyesore that seems to mock you every time you walk past it.
Early in my decade-long career in home improvement, I watched countless homeowners try to fix these blemishes by shoving a mountain of spackle straight into the void, only for it to shrink, crack, and fall out a week later. The secret to a permanent, undetectable repair isn’t just the mud you slap on top; it is the structural skeleton you embed within it. That is where the mastery of drywall patch mesh comes into play.
If you are a DIY enthusiast or a growing handyman looking to graduate from messy, amateur patches to flawless, professional-grade walls, understanding the mechanics of composite mesh reinforcement is your ultimate shortcut.
The Physics of Wall Cracks: Why Mesh is Non-Negotiable
To understand why raw joint compound fails on its own, you need to think about structural movement. Your home is a living organism; it shifts, expands, and contracts with seasonal temperature fluctuations and humidity changes.
When you create a hole or a seam in sheetrock, you break its structural continuity. Joint compound has excellent compressive strength but terrible tensile strength—meaning it can handle being pushed, but it cracks easily when pulled or flexed.
Think of drywall patch mesh as the rebar inside concrete. By embedding a high-tensile fiberglass or aluminum matrix into the repair zone, you distribute the shifting forces across a wider surface area, preventing microscopic movements from telegraphing through your paint as an ugly hairline crack.
Selecting Your Armor: Fiberglass Self-Adhesive vs. Aluminum Backed Mesh
Not all patches are created equal. Walk down the drywall aisle of any home center, and you’ll find different variations of reinforcement. Choosing the right one depends entirely on the diameter and depth of the damage.
1. Self-Adhesive Fiberglass Mesh Tape
This is the classic open-weave grid pattern tape. It is incredibly thin, flexible, and coated with a pressure-sensitive adhesive on one side.
-
Best Used For: Hairline stress cracks, shifting seams, and small punctures under $2\text{ inches}$ in diameter.
-
The Mechanical Advantage: Because it is an open weave, the joint compound presses completely through the grid, creating a mechanical lock between the wall face and the backing board.
2. Rigid Aluminum Drywall Patch Mesh
For larger holes—like the classic doorknob breakthrough—fiberglass tape alone will sag into the wall cavity. You need a composite patch featuring a perforated aluminum plate bonded to a wider fiberglass mesh overlay.
-
Best Used For: Deep punctures ranging from $4\times4\text{-inches}$ to $8\times8\text{-inches}$.
-
The Mechanical Advantage: The aluminum core provides a rigid, unyielding bridge across the void, while the surrounding mesh feathers out the height transition to keep the wall flat.
| Damage Type | Hole Diameter | Recommended Hardware | Complexity |
| Stress Line/Crack | N/A | Fiberglass Mesh Tape | Beginner |
| Small Puncture | Up to $2\text{ inches}$ | Heavy-Duty Mesh Strip | Beginner |
| Mid-to-Large Hole | $2\text{ to }8\text{ inches}$ | Aluminum Drywall Patch Mesh | Intermediate |
The Step-by-Step Anatomy of an Invisible Patch
Achieving a seamless finish requires a precise blend of prep work, mechanical bonding, and patience. Here is the field-tested workflow I use on my own job sites:
Step 1: Substrate Stabilization and Cleaning
Before peeling the backing off your drywall patch mesh, you must prepare the wound. Loose gypsum dust, torn paper liner, and crumbling plaster will instantly destroy the mesh’s adhesive bond.
Take a sharp utility knife and undercut the edges of the hole at a $45\text{-degree}$ angle, removing any loose debris. Wipe the surrounding area down with a damp tack cloth to ensure absolute dust elimination.
Step 2: Applying the Mesh Foundation
Center your mesh patch over the damage. Press firmly from the inside out, using a plastic putty knife or your fingers to ensure there are no air pockets or wrinkled edges.
The mesh must extend at least $1$ to $2\text{ inches}$ beyond the perimeter of the damage to properly transfer the structural load to the stable, undamaged drywall surrounding it.
Step 3: The Compound Application (The “Feathering” Technique)
This is where amateurs usually get tripped up. If you apply a thick layer of mud directly over the patch and stop at the edges, you will create a noticeable hump on your wall.
-
The First Coat: Use a setting-type compound (hot mud) for the first layer over an aluminum patch. It undergoes a chemical cure rather than simple evaporation, shrinking significantly less. Use a $6\text{-inch}$ taping knife to force the mud through the mesh holes.
-
The Second Coat: Switch to a lightweight ready-mix topping compound and an $8\text{-or }10\text{-inch}$ knife. Apply pressure to the outer edges of the knife, drawing the mud out several inches past the initial layer. This creates a gentle, microscopic slope that fools the human eye.
💡 Pro Tip: The Mud Selection Secret
Never use standard yellow-lid all-purpose joint compound for your first coat over self-adhesive fiberglass mesh tape. Fiberglass mesh is more elastic than paper tape. All-purpose mud dries slowly via evaporation and remains slightly flexible, which can lead to delayed cracking. Always use a chemically setting compound (like Easy Sand 45 or 90) for your base coat to lock the mesh in place like stone.
The Dreaded Mesh Fraying Dilemma
One of the most frustrating experiences for a beginner is the “fuzzy wall syndrome.” You apply your mud, let it dry, and start sanding—only to realize your sanding block has torn the delicate fiberglass threads of your drywall patch mesh, causing them to fray and stick out through your smooth finish coat.
If this happens, do not keep sanding. You will only make the fuzz worse. Instead, stop immediately, take a fresh razor blade, and carefully shave away the protruding threads. Apply a very thin, tight skim coat of topping compound over the area, let it cure completely, and sand with a fine $220\text{-grit}$ sponge using minimal pressure.
Restoring Value to Your Space
Wall damage can make even the most beautiful home feel neglected, but a structural repair doesn’t require a professional price tag. By understanding the mechanical role of drywall patch mesh, choosing the right material configuration, and mastering the art of feathering your joint compound, you can restore your surfaces to flawless perfection.
Are you preparing to fix a stubborn blemish on your walls, or do you have a patching project that went wrong? Let me know in the comments below what kind of wall damage you’re facing, and let’s get your surfaces looking brand new again!